while we're slowly bringing the wheel up to tension 1/4 nipple turn at a time you'll now want to start checking the tension to make sure that they're fairly consistant. The DT tensiometer is measuring the spoke deflection. And not only am i looking for consistant tension i also want to bring them up to DT's recommended values. For the DT Champion spoke i'm looking for deflection value of 2.2 or 105 kgf. Precise.
before we start the final tensioning add a drop of lube at the nipple/rim eyelet interface. The lube makes the minute nipple adjustments much smoother as the tensions gets higher. I'm using triflow.
before we start bringing the spokes into the final tensioning and trueing stage it's important to stress relieve the wheel first. This step helps seat the spoke heads and nipples. I relieve the tension by grabbing four adjacent spokes, two in each hand and squeezing about as hard as i physically can. Two complete revolutions should be good. After you do this you'll notice that the spoke tension is dramatically lower than before this step. Thats good !
start by adding a full turn at each nipple until you begin to feel tension come. Once you get to this point you can now start adding 1/4 turns incrementally while also checking on the lateral trueness, dish, and roundness. Go back and fourth between these disciplines and you'll eventually begin to bring the wheel into life. Having the proper tool will ease the process. I'm using a Park WAG-4 dishing tool and Park TS-2 trueing stand.
with the wheel laced we can now place the wheel into the trueing stand. Grab the nipple driver (or primitive screw driver ; ), and drive each nipple down so that each nipple just covers the VERY LAST spoke thread. This gives us a good/equal starting place to begin adding tension to the spokes.
and now to the final set of spokes. While still looking at the wheel from the driveside go ahead and drop the last 8 spokes into the nondrive side flange so that the spoke heads are facing inward. Flip the wheel over and fan the spokes out. The remaining position of the spokes should be very straight forward just make sure you keep with the over/over/under on the spoke crossings.
after you finish the lacing of the wheel. You can go back and check to see if your hub logo can be seen directly from the valve hole, you'll also want the decals to be read from the drive side directly under the valve hole. Small aesthetic differences that make a subtle statement.
now on the 3rd set while still on the disc side go ahead and drop 8 spokes in from the backside of the hub flange so that the spoke heads are facing inward. Flip the wheel over and fan out the spokes. Starting with the very 1st spoke from the 1st set count over 8 spokes and this will be your 1st spoke for the 3rd set .Wind the hub up clockwise and run the 1st spoke of the 3rd set over/over/ and under the crossing spokes and place it into the 2nd eyelet to the left of the valve hole (see pic #2). Run the other seven spokes.
flip the wheel over to the disc side....the first spoke on the 2nd set of spokes should be placed directly to the left of the first spoke from the first set both on hub and rim, done successfully you'll have this spoke placed in the second eyelet to the left of the valve hole. Once you have your second spoke set go ahead and place the other 7 spokes from this set in every fourth hole on the rim.
starting on the driveside i drop the 1st spoke thru the hub (spoke head facing out) at approx 90 degrees clockwise from the hub logo (this centers the hub logo to be seen thru the valve hole once wheel is laced completely, a small aesthytic difference), then run the spoke to the very first eyelet directly to the right of the valve hole. This is the first spoke and most critical. Once you drop the first spoke into place go ahead and drop the other 7 spokes from this set and place into rim at every fourth eyelet.
vehicle for hire. I've only ridden in this van twice and i can still recollect the facial reactions of the motorist as we pass. It's pretty damn comic, well at least until you hit the fuel station. On my first trip i made the mistake of picking up the tab of the dual 20 gallon tanks. Good god that was an expensive mistake.
during a recent king rear hub overhaul i thought i'd take a couple of pics of their ring drive system....it's a beautiful design that's not as prone to typical pedal torque wear and tear. Why ?? Because much of the loads are displaced from their helical spline, between the spline and the engagement teeth they create a drive that can handle up to 800 ft/lbs of torque...that's pretty darn good. But besides all of this technical information the true beauty of these hubs is how easily they can be COMPLETELY torn down for an overhaul with the use of the King Hub Service tool. This hub shown here has 4 years of use logged in and the teeth still look brand spankin' new. The bearings, still buttery smooth. King hubs are expensive but we think they're worth every bloody cent.
welp, we just can't get away with posting pictures of nice bikes and bike parts....how about a little music share too ?? So what are we listening to inside the walls of the red barn...... RL Burnside baby ! One of the greatest blues guitarist and vocalist ever.
The perfect tunes for a friday afternoon. Have a good weekend folks !
we just rec'd a good batch of Syncros's new line of stems and handlebars. Most of you remember syncros as a strong recognizable brand from the early nineties but they kind of lost track of a vision and inevitably made a few crap products that sent them spiraling off of the radar screen. Well it's been about ten years and a change in management, a merger with industry giant Ritchey Design which also brought a change to overseas production ( but please don't let that fool you) ..... SYNCROS is indeed back ! We're super excited with what we've seen coming out of this company. A wide range of high end components for just about every aspect of mountain biking.
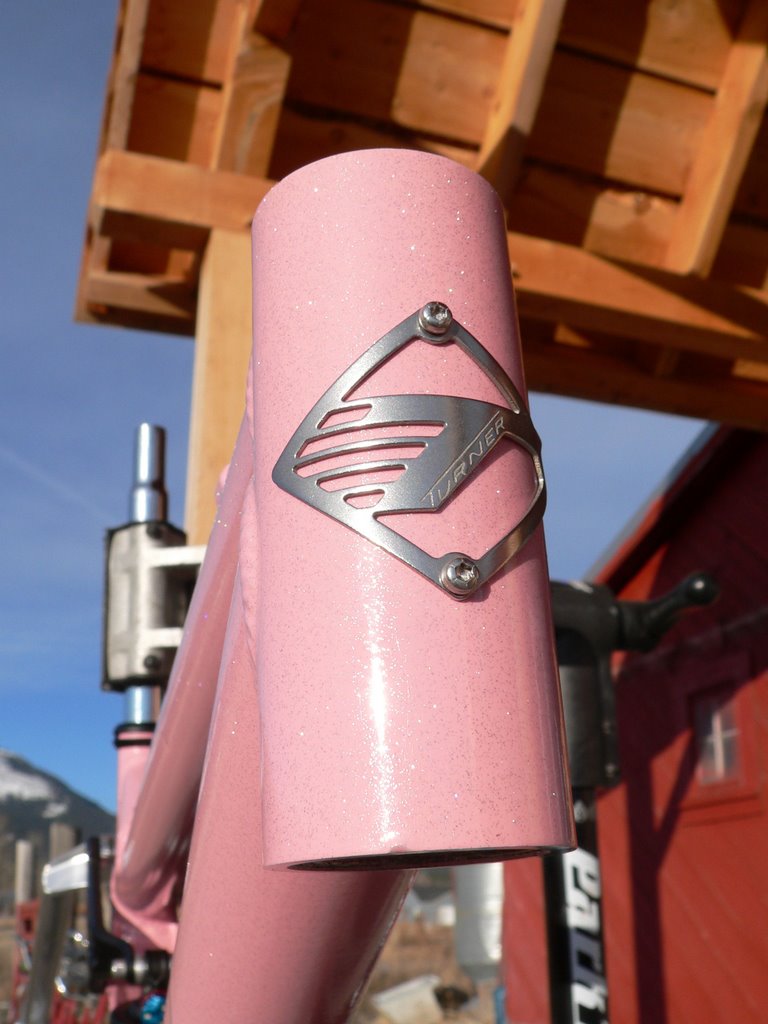
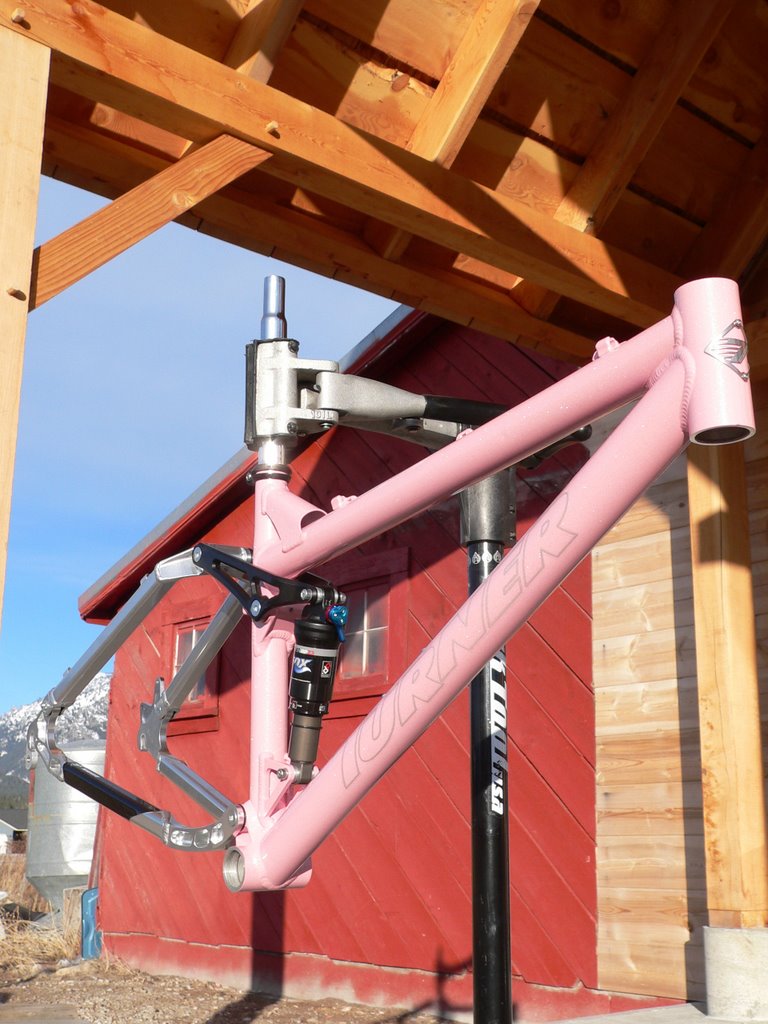
we just recieved this custom pink Turner Flux today and unfortunately through a little miscommunication we were sent the wrong size. The customer wasn't too bummed since the riding won't be good until March. So, I went ahead and played the good bike dealer and told Dave and Jarett over at Turner that i'd still like to keep this frame instead of opting to send it back. YES, it'll be the first pink frame to be hung from the walls of the red barn but it'll add a little color to the decor...don't you think ? Do you have a love in your life that needs a flux....or are you a closet metrosexual ? Then here's your chance. Price is right for the picking....if your picking is pink.
just thought i'd share a shop tool with you folks. We just recieved out new Enduro external bb installation tool that fits on to a 3/8" ratchet. The tool also came with the crank preload tool which fits a 1/4" ratchet. Both tools will be replacing our Park BB9. Nothing wrong with the BB9 just time for something a little quicker and of course a little higher quality manufactured. Who doesn't like cnc'd made sweetness ?
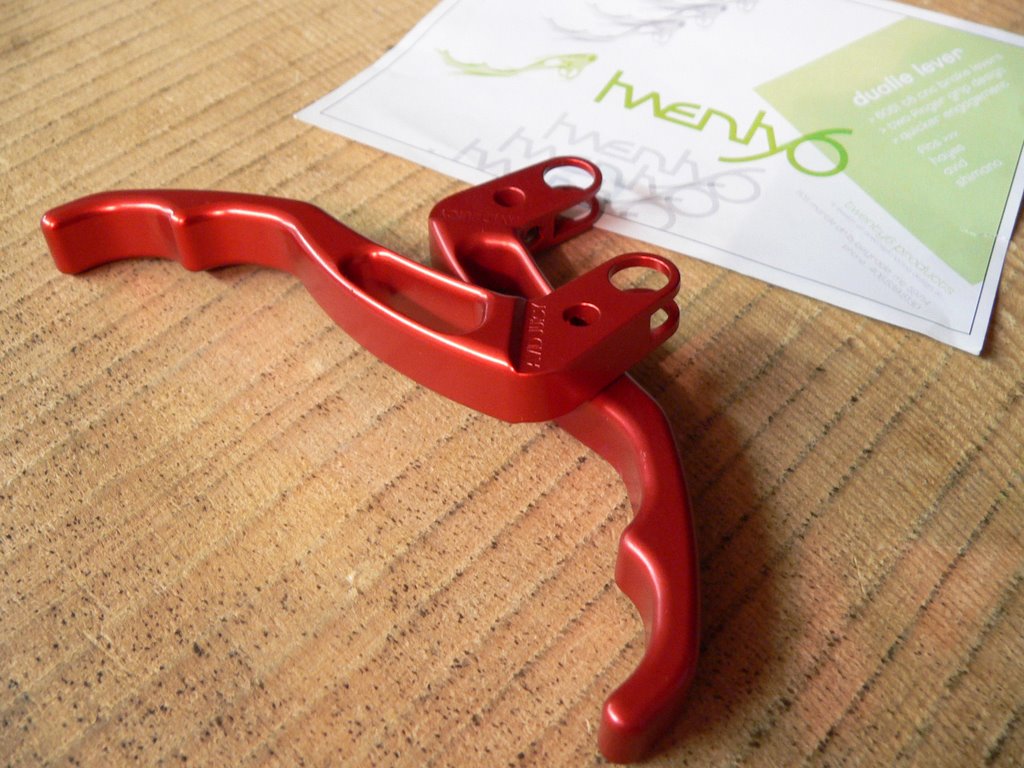
we finally got our hands on a few sets of their new mechanical pull levers, they look awefully nice and Avid BB-7 owners should be happy with the performance gains over typical SD7/ SDsl levers. Weight is 115 g per pair, come in a range of colors and run $65 per pair.
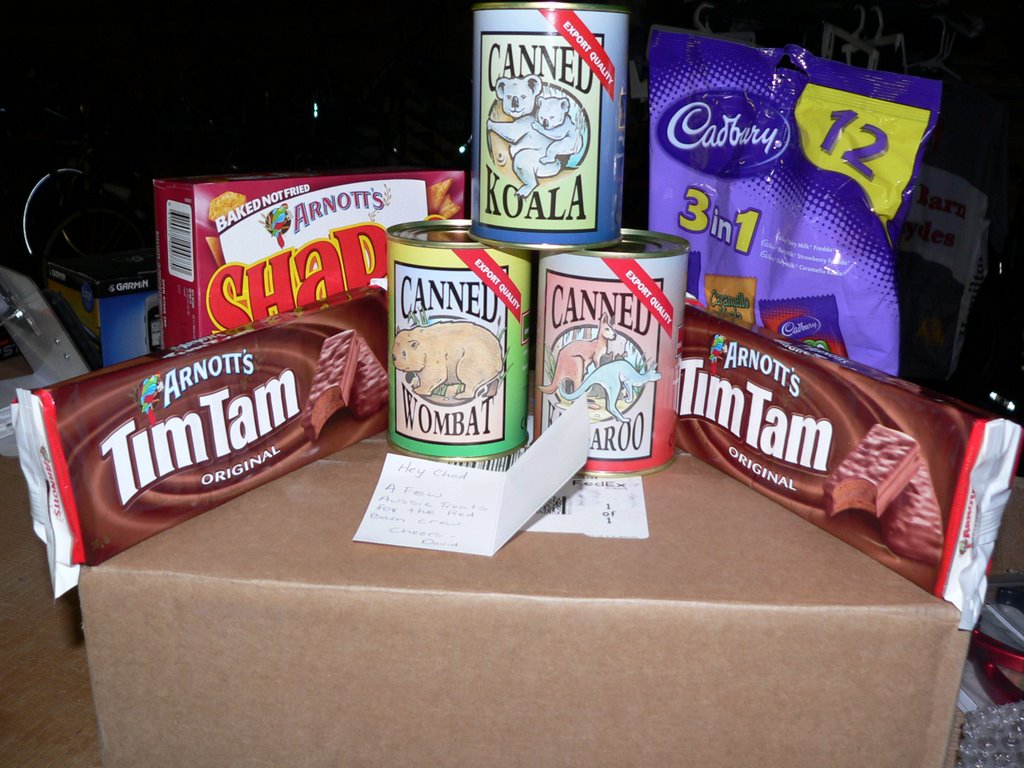
okay, just a small joke. But i just thought i'd share with you at what was dropped off at the shop today. A box marked with a label " Aussie products" , i guess i should have known right then at what it was but nope...no bells or lights went off inside of my noggin. So i open it up...and the first thing i grab is a can of Wombat...WTF ! What kind of sick joke is this i thought, but then i look closer and pull out more interesting objects. A bag of Tim Tam cookies....Tim Tam who ? and then the next object after the next after the next. As i sat here checking all this stuff out, scratching my head, it took me a little while to actually notice the small note attached to the chocolate cookies. It read " A few Aussie treats for the Red Barn Crew" Cheers, David. Mighty generous of you David, and we'll certainly pass the treats around, thanks a bunch. I actually should have known as it was about this time last year that you loaded me up with a can of vegemite , damn that stuff was bad, and i do mean BAD. I'm hoping for the best this go-around as the stuff looks purdy darn tastey. Enjoy your aussie summer, Chad
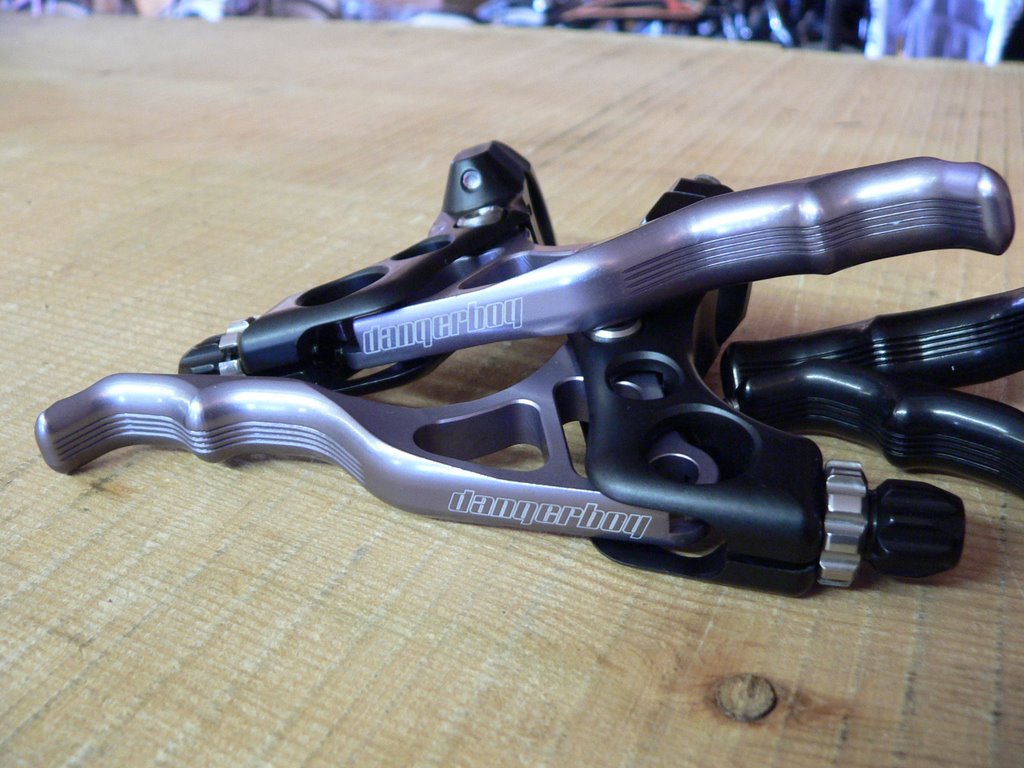
So, my good pal John calls me up and tells me about a small start up company over here in Belgrade MT a few weeks ago. Says a good fella by the name of Tyler is making some very nice mtb bike parts. Brake levers and aluminum billet platform pedals. So being the good neighborthat i am i call Tyler and have him rush me over a couple sets of his new levers designed to work with Avid Juicy hydraulics (he also makes levers for hayes, and shimano too). They looks stunning and just a tad bit longer than the stock lever, which is fine by me. Price is $60 for a pair and the kicker is that he's doing the anodising in just about every color under the rainbow. Pink...no problem, green....absolutely ! Give me OR better yet give Tyler a call and place an order for a pair (406-539-5130) Good job Tyler, they look great and we can't wait to throw a set on to a deserving two wheeler.
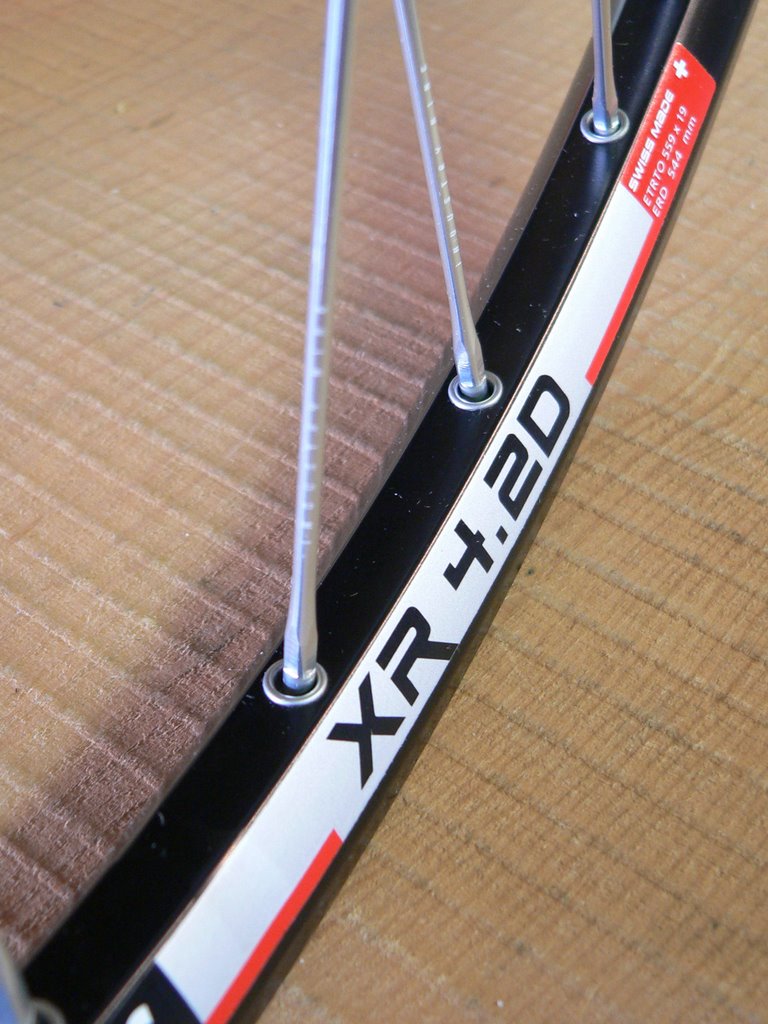
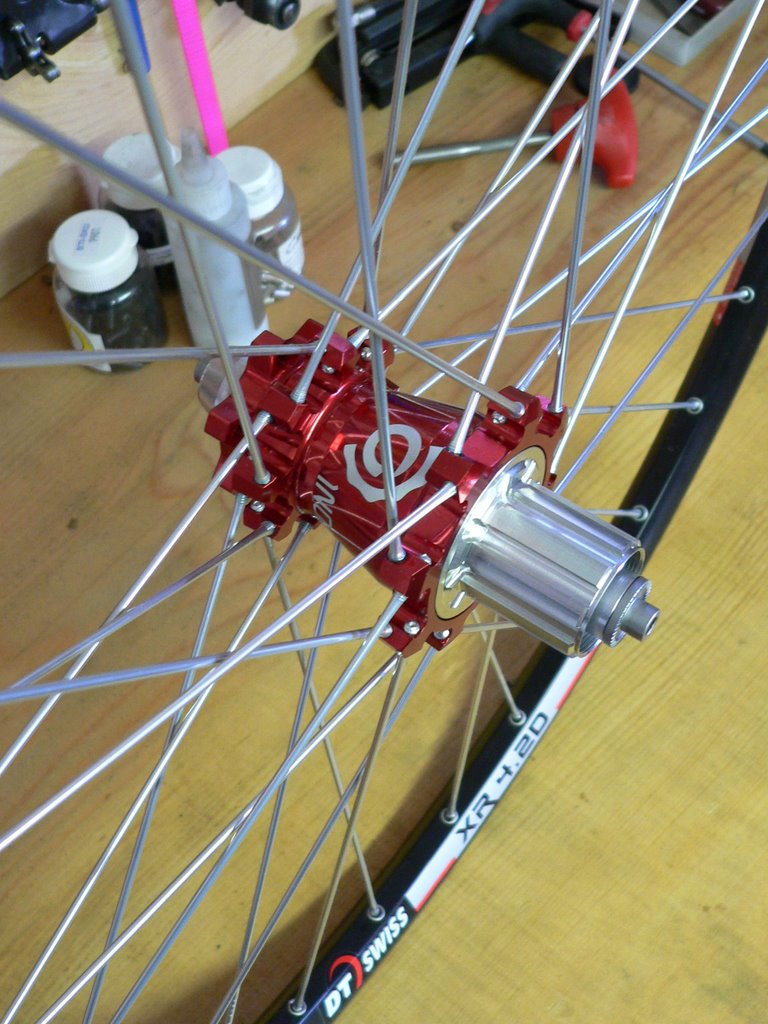
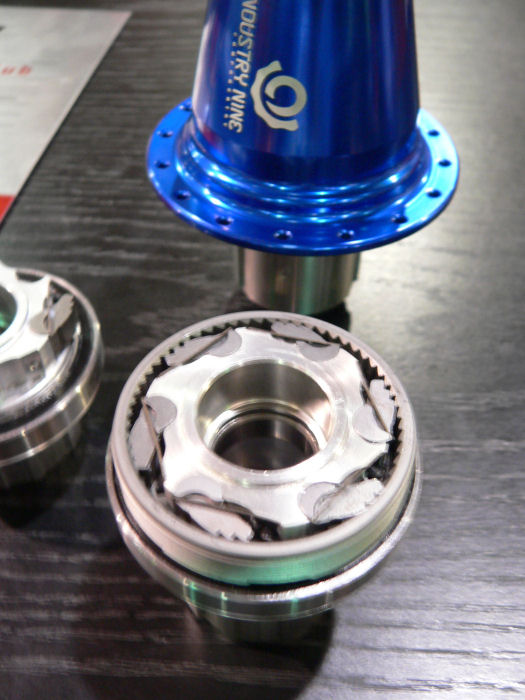
so here's what was in the box. A set of Industry Nine hubs laced to DT's new 4.2d rims , they turned out beautifully and a quick check on the Park TS-2 confirmed that the wheel builders over at I9 are precise with their wheel building, nothing that i haven't come to expect from them. I also double checked the tensions, which aluminum spokes are approx 30% higher in tensions producing a very laterally stiff wheel. Folks concerned with how well their bikes corner or how they hold a line through a rock field will be delighted with the out come. I also think the wheels would be perfectly at home on a 29" mtb were you typically find wheels with spokes that are 25-30mm longer in length. But anyway...... one of the most exciting aspects of these wheels is what is INSIDE the rear freehub. Check out the cut out of the rear hub on this picture that i took while at Interbike this past october. As you can see it's a 6 pawl drive, but if you look very closely you'll see that only 3 of the pawls engage at any given time, the other three are offset by 3 degrees creating almost instantaneous engagement. damn fine engineering...damn fine. Here's the pics.
i finally got the computer back up and running after the cold temps disabled my wireless connection. It almost got to the point were i was going to run up a ladder and warm the antenea up by hand ; ) , but fortunately i surround myself with wiser folks then i and they talked me out of such a drastic move. I can almost see how it would have played out...... I climb the icy ladder to throw ear mitts and a scarf wrapped lovingly around the dish. Thanks to Brian and Joe it never happened.
this new fork from Magura just may be a hit IF the reliability issue has been fixed. It's no secret that the first run had some air seal issues, but the tech fellas over at Magura felt confident enough in their fix that they sent us this Wotan to try out and report back. We should be installing it within the next few days and will follow up with a ride report. If you look into the numbers and read the text then the fork looks VERY promising. 160mm of air sprung travel that can be adjusted down to 120mm via remote control from the handlebar (a serious benefit when climbing). It also has a double arch design, 36mm stanchions, and a thru axle that should attribute to a VERY good tracking front wheel. Another decent benefit is that the thru axle uses the patented ROCK SHOX MAXLE, we really like this small piece of attention. The weight is also decent at 5.4lbs. Additional info can be found here
eight gears in the rear !!! isn't it all that we really need ? Well maybe not, but just in case you're needing a drivetrain that lasts MUCH longer and is more durable, then you owe it to yourself to reconsider the temptation of 9 thinner, punier gears. The recipe to endurance: XTR M900 11-32 cassette, Sram PC68 chain, and Shimano XT M748 shifter pods OR play the part of the serious retro grouch and run a set of Deore or XT thumbies (yes the 7spd shifters with the hidden 'ghost eighth'). You really owe it to yourself and you'll thank me for it later ; )
and speaking of hydraulic brakes. It brings up the subject of these slick little hose blocks made by Shimano. Stubborn hose barbs ... no problem, insert hose barb and tap in with a small rubber mallet. Cheap too....$5 for the pair and they're a necessity for the home mechanic.